Saturday, April 23, 2016

Spring is coming and the birds (and humans) are tweeting!

The sun is out and students are getting spring fever, at least those in middle school. Teachers are getting close to the finish line and starting to become introspective. Such is the circle of teaching. In this post, I want to share with you all my experience with tweeting in the classroom and hopefully convert you to a twitter super user!

I know...Twitter. Isn't that where I can follow the Kardashians?
-Sure! I don't but you can. 

In addition to seeing what Kim and Kanye feel about things, what you can also do is develop as a teacher effortlessly, daily, and rapidly! If you've held out from Twitter, which for years I did (though I maintained a "personal" twitter that I rarely use(d)), it might because you saw it as a.) ineffective, b.) a time occupier, or c.) scary. Until this year, I felt a, b, and c. This was until we started a campaign in our district: #wiltonwayct. 

Twitter as Classroom PR
We started using Twitter to advertise our work in the classroom. It was PR at it's best and easiest. Teachers saw student work and teacher effort. We liked each others' tweets and became digital cheerleaders (and robbers-for we took from them what we may not have had time to go and see ourselves!). Administrators started a presence on Twitter and liked our tweets, helping us to feel supported and seen, which is difficult in the age of one million evaluations (on top of every other administrative task they had to do). Parents and the community saw our tweets and got a view into the classroom, something they rarely get. We opened our classroom door to others around our town, state, country, and yes, world. 

Twitter as Free, Fast, and Easy PD
Another wonderful benefit is professional development. Twitter allows you to post your learning, it allows you to follow fellow teachers and learn from them, and even participate in Twitter chats! I've had the most WONDERFUL discussions, coming in at 140 characters a thought. With Twitter, teachers can post their thoughts, their work, and engage in conversations with fellow educators, all while in their jammies. 
-Not my jammies, but I sure WISH they were.

Now I know what you may think-social media presence, just another thing to do or a possible deterrent in opening myself up online. I have below some dos with Twitter, and a link to how to start a twitter and how to use it effectively. I hope that after you read on, you TOO become a super user!


The DOs
-DO start a separate twitter username (handle) to separate from personal accounts you may have. 

-DO post your twitter handle on your syllabus and in your email signature. I have several students who follow me, and it's a great way to keep in touch with graduating students, too!

-DO take pictures and videos of what is going on in your classroom and post it to Twitter, maybe even with a hashtag campaign with your fellow district colleagues! (Please check with your district's policy on student photographs online, and DO ask your students' permission each time). 

-DO try to make a post regularly. This may mean once a week, every couple of days, or every day. Posts can be sharing what you have read on Twitter (re-tweeting), original posts, or questions farmed out to teachers all OVER the world. A post takes only a minute to cobble together.

-DO respond to tweets you like by "liking" them or "retweeting" them. This helps to share the wealth and make digital colleagues (and it is exciting for your colleagues to receive accolades). 

-DO invite your colleagues and administrators to follow you. Twitter becomes such a cool virtual pep rally between colleagues. (Don't lie about how good it felt to see that little red heart light up when someone liked your work!) 

-DO try out Twitter chats. Nearly EVERY professional organization with teaching has a weekly Twitter chat (such as ACTFL for World Language teachers). If there isn't one you have found, make one yourself!

-DO set parameters for yourself. How will you use it with your students? How will you use it with your colleagues? How will you use it for the community? What will you post? How often will you check Twitter? Setting guidelines help to not get overwhelmed. Once you start tweeting, it's pretty awesome and fun, but let it fit in your life and your timeframe!

Important Links! Click to Learn More


I hope you enjoyed this post about Twitter and I hope you join (if you haven't already!) My username is SrBonito1. Follow, please! I look forward to tweeting with you!

Until next time,
Scott


Wednesday, April 13, 2016

All arms rowing in the same direction with Doctopus and Goobric

A little bit of a longer entry-stick with me for this ride! It is well worth it. There are lots of pictures to keep everyones' attention.

Stacks of paper just rife for the losing. This is a teacher's biggest fear. I remember as a beginning teacher that I would take home mounds of grading and I would guard these papers like they were Knoxville gold bars. When I got home, I would spread them out on my kitchen table in neatly laid piles (since my type A personality knows no bounds) and the piles would shift, move, and eventually be neatly re-stacked and added to my bag once more. I can tell you, I've ruined three bags with the over pregnant state from the contents within destroying the zipper.


This vicious cycle continued and I certainly lost papers in the meantime, leading to awkward conversations with students, begging that they check their jump drives one more time for a copy. Then my life was changed with Doctopus with Goobric for Google Apps for Education. I'd like to thank my colleague Darren for this life-changing introduction. For those who don't know, Doctopus and Goobric work in tandem to create, utilize, and disseminate rubrics for a variety of assignments. With the help of its partner in crime, Google Classroom, I began to have students turn in work they had completed online, graded it online, typed in extensive commentary (which was much easier than hand writing it, am I right?) and have sent back the completed rubric to the students via their Gmail. This process also helped to compile records of student work for parents, just in case students accidentally tripped and dropped a paper in the wastepaper basket, because they would never, EVER throw away passed back work, right? So, how does this magic work? If you've used it before, skip ahead to my take-aways, otherwise read on!


AFTER INSTALLING and AUTHORIZING DOCTOPUS and the Chrome Extension GOOBRIC..

1. Create an assignment for students in classroom and share out the template with students (or you can have students complete an assignment and turn it in through classroom, whichever you prefer). I would also share out a PDF of the rubric for reference.

2. Students turn in the work through Google classroom.

3. Create a spreadsheet for each class for this assignment, which will house all the details and grades of the assignment. Make sure to have a naming convention. (Ex. SpanishReview B Period).
                                             

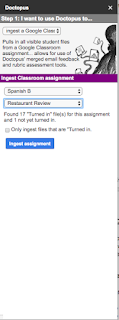
4. Launch Doctopus in the Google Sheet and choose "Ingest Google CR assignment", select the class, and select the particular assignment you want to "ingest". Click "Ingest assignment".


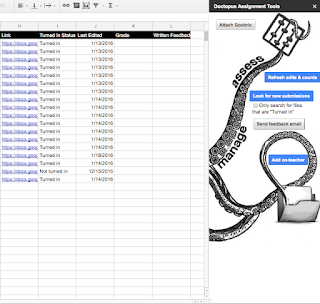
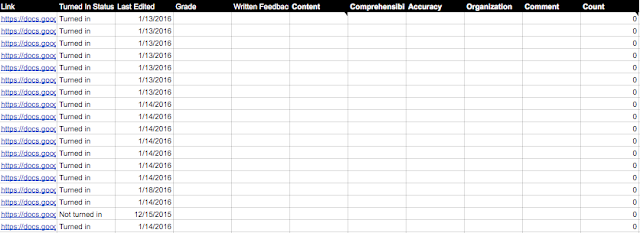
5. This will now create a new tab on the existing spreadsheet that has each student's piece of work: Their first and last name, email address, file key, file name, link to the document, status (turned in or not), last edited date, grade, and your written feedback.


6. Click on "Attach Goobric" and select the file with your rubric from your Drive. It will give you options to make rubric viewable to students, which I would check, allow self/peer assessment (your choice), and send email notification to students, which I would select. Click "attach rubric". This will add another tab to your spreadsheet. Now each category is broken down, if you want to tease out categorical data. NOTE-you will have to do this each time for each new Google Sheet you will make for each class.
 

That's it! Now you can click the links to start grading! When you click the link next to each student's name, it will open their document. Now, this is where Goobric comes in.

ONCE IN THE FIRST STUDENT'S DOCUMENT...

1. Click the Goobric extension opener. It will then reopen the document you opened with a rubric at the top to add point values and a comment box to add your comments and email comments.
As you complete the rubric, you can send off the document to the student's email address with commentary and that rubric will appear at the bottom of the document as well.

Ready for the next student? Click "Next" (as you can see is next to "submit" in the picture above" or the drop down box above the comment box to jump to different students in that class. You can also record audio commentary as well. Next to the black box (which I used to black out student's name) on the top right you can see icons for record, pause, and stop. Haven't tried it, but I bet it's great!

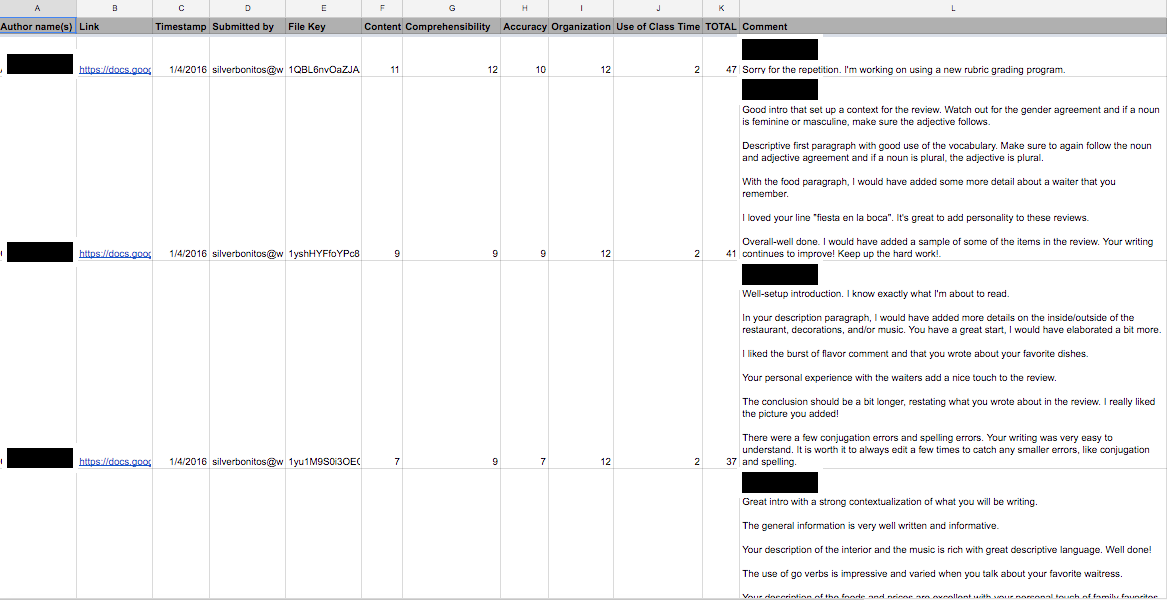
PHEW! That's it. Let me show you a completed rubric Doctopus Google Sheet. You can see the authors' names, links for each document, timestamp, rubric categories, total score, and comments. The best part, it's ALL IN ONE PLACE!

TAKEAWAYS
-All students' written work stays in once place, in one Googlesheet, with the data broken down and written commentary. It's amazing and it saved me MOUNDS of time. It is amazingly easy to use and teaches students to check their emails, too! (added benefit).

-It teases out student data to see where they succeeded and where they need room for growth. This is great in the era of data collection.

-The first time using this is a bit taxing, but gets easier as time goes on, I promise.

Here is a video tutorial for YouTube (can't take credit for it, but it is very VERY inclusive!)

I hope I didn't lose you! Thank you for reading, following, and sharing this. Happy integrating!

Until next time,
-Scott

Monday, April 4, 2016

Flipping the classroom

If you were to walk into my classroom 7 years ago (which to me seems like ancient times) you would have seen a teacher going by the old playbook. Direct instruction, activity, check-in, wrap-up. Lather, rinse, repeat. This isn't bad teaching, by any stretch of the imagination, but for me it got stale and fast. I felt like I was caught in a tornado of tedium. I could see it on the students' faces.
 
I decided to do some research and break the cycle. This is when I discovered the term "flipped classroom". It changed my life. Now, I know what you are saying: "Scott, stop being so dramatic". No, no, honestly it did. From that point on, I began to phase out needless direct instruction, which YES has a place, but not in teaching verb charts as a world language teacher. I began to shift my focus to pre-learning at home for the kids, and stations and real life scenarios at school. I went from sage on the stage, to traffic cop to some mild, controlled chaos. 

The next plateau in this journey was when we began to integrate into a Google Apps for Education district. YouTube and Google Forms became my best friend. Walk into my classroom now and you will see (for the most part) students with notes already taken, misconceptions already worked out (again, for the most part) and ready to APPLY and CREATE. Now I do simulations, creation of infographics, Google walking tours with Google maps, videos, skits...it's wonderful. I'm just one person on the flipped bandwagon, but here is what I have found helpful. Happy flipping! 

Step 1: Identify the topic. 
What do you want your students to learn? Something manageable and age appropriate. I wouldn't go for differential calculus here. Vocabulary, verb charts, simple equations, they all fit here. 

Step 2: Find media to support the learning.
It could be a YouTube video you create, someone else has created, an article, an infographic, something that the students can consume at their own pace, on their own time, and repeatedly, if need be. Keep it short and sweet; don't give them War and Peace.  

Step 3: Connect the media to a survey/form for your students to fill out after. 
I use Google Forms. Edupuzzle is good too! Educannon is wonderful, too, though it comes with a price tag for some of the other features. 

Step 4: Distribute and collect.
Have the students complete the activity, collect the results, and plan for instruction. Who needs help? Who is exceeding? How can you adjust instruction, and free up classroom time for fun activities to APPLY learning and have students create. 

Step 5: Lather, rinse, repeat. I love Flipped learning. My students know the term flipped learning, and I teach them the benefits of pre-learning with a flipped classroom, and frankly, they get a kick out of it when I make my own videos. I think I have a mini-fandom. 

Until next time!
-Scott