Stacks of paper just rife for the losing. This is a teacher's biggest fear. I remember as a beginning teacher that I would take home mounds of grading and I would guard these papers like they were Knoxville gold bars. When I got home, I would spread them out on my kitchen table in neatly laid piles (since my type A personality knows no bounds) and the piles would shift, move, and eventually be neatly re-stacked and added to my bag once more. I can tell you, I've ruined three bags with the over pregnant state from the contents within destroying the zipper.

This vicious cycle continued and I certainly lost papers in the meantime, leading to awkward conversations with students, begging that they check their jump drives one more time for a copy. Then my life was changed with Doctopus with Goobric for Google Apps for Education. I'd like to thank my colleague Darren for this life-changing introduction. For those who don't know, Doctopus and Goobric work in tandem to create, utilize, and disseminate rubrics for a variety of assignments. With the help of its partner in crime, Google Classroom, I began to have students turn in work they had completed online, graded it online, typed in extensive commentary (which was much easier than hand writing it, am I right?) and have sent back the completed rubric to the students via their Gmail. This process also helped to compile records of student work for parents, just in case students accidentally tripped and dropped a paper in the wastepaper basket, because they would never, EVER throw away passed back work, right? So, how does this magic work? If you've used it before, skip ahead to my take-aways, otherwise read on!
AFTER INSTALLING and AUTHORIZING DOCTOPUS and the Chrome Extension GOOBRIC..
1. Create an assignment for students in classroom and share out the template with students (or you can have students complete an assignment and turn it in through classroom, whichever you prefer). I would also share out a PDF of the rubric for reference.
2. Students turn in the work through Google classroom.
3. Create a spreadsheet for each class for this assignment, which will house all the details and grades of the assignment. Make sure to have a naming convention. (Ex. SpanishReview B Period).
 4. Launch Doctopus in the Google Sheet and choose "Ingest Google CR assignment", select the class, and select the particular assignment you want to "ingest". Click "Ingest assignment".
5. This will now create a new tab on the existing spreadsheet that has each student's piece of work: Their first and last name, email address, file key, file name, link to the document, status (turned in or not), last edited date, grade, and your written feedback.
6. Click on "Attach Goobric" and select the file with your rubric from your Drive. It will give you options to make rubric viewable to students, which I would check, allow self/peer assessment (your choice), and send email notification to students, which I would select. Click "attach rubric". This will add another tab to your spreadsheet. Now each category is broken down, if you want to tease out categorical data. NOTE-you will have to do this each time for each new Google Sheet you will make for each class.

That's it! Now you can click the links to start grading! When you click the link next to each student's name, it will open their document. Now, this is where Goobric comes in.
ONCE IN THE FIRST STUDENT'S DOCUMENT...
 1. Click the Goobric extension opener. It will then reopen the document you opened with a rubric at the top to add point values and a comment box to add your comments and email comments.
As you complete the rubric, you can send off the document to the student's email address with commentary and that rubric will appear at the bottom of the document as well.
Ready for the next student? Click "Next" (as you can see is next to "submit" in the picture above" or the drop down box above the comment box to jump to different students in that class. You can also record audio commentary as well. Next to the black box (which I used to black out student's name) on the top right you can see icons for record, pause, and stop. Haven't tried it, but I bet it's great!
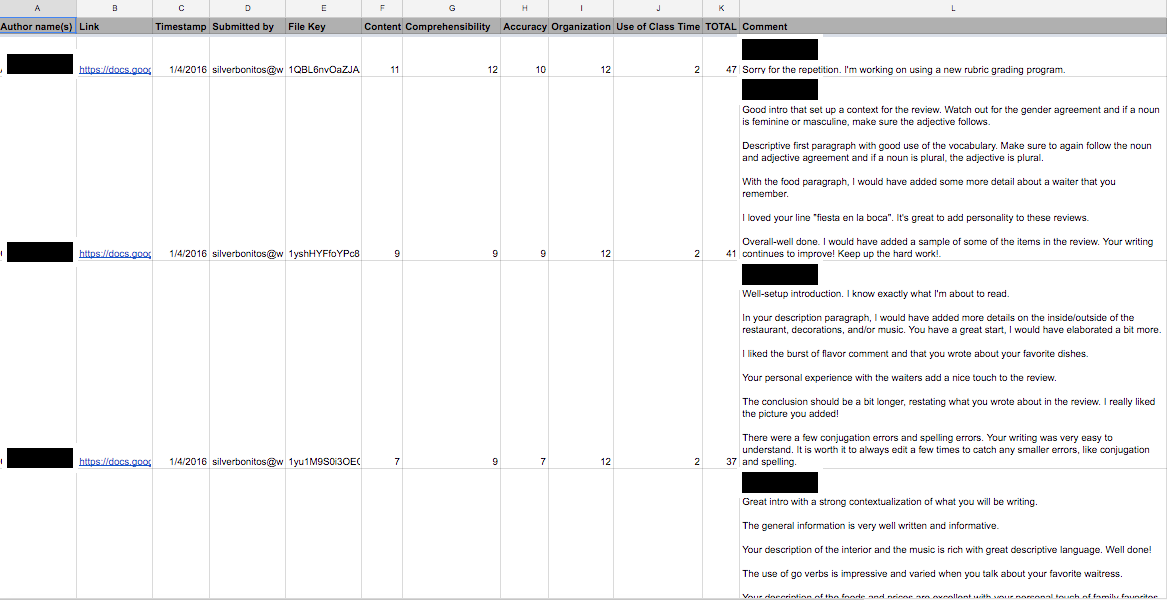
PHEW! That's it. Let me show you a completed rubric Doctopus Google Sheet. You can see the authors' names, links for each document, timestamp, rubric categories, total score, and comments. The best part, it's ALL IN ONE PLACE!
TAKEAWAYS
-All students' written work stays in once place, in one Googlesheet, with the data broken down and written commentary. It's amazing and it saved me MOUNDS of time. It is amazingly easy to use and teaches students to check their emails, too! (added benefit).
-It teases out student data to see where they succeeded and where they need room for growth. This is great in the era of data collection.
-The first time using this is a bit taxing, but gets easier as time goes on, I promise.
Here is a video tutorial for YouTube (can't take credit for it, but it is very VERY inclusive!)
I hope I didn't lose you! Thank you for reading, following, and sharing this. Happy integrating!
Until next time,
-Scott
No comments:
Post a Comment