Sunday, May 22, 2016

Road Tripping in the Classroom with Google Tour Builder


Ready for summer vacation? I know most students and teachers are ready for a much needed R&R and recharging of the batteries. Remember when road trips used to be planned using physical maps? Our students probably don't. Though, I remember sitting in the back of my parents' car with the AAA trip-map, cross-checking as we drove down I-95 to Florida. Then it was Mapquest, Google maps, and Apple maps. Google has provided an excellent opportunity to road trip in the classroom without ever having to pack a bag. Google Tour Builder is this opportunity!


What is Google Tour Builder
From the Google Tour Builder website: "Tour Builder is a new way to show people the places you've visited and the experiences you had along the way using Google Earth. It lets you pick the locations right on the map, add in photos, text, and video, and then share your creation." In other words, you can use Google Tour Builder as an opportunity to showcase a geographic tour of different locales, adding text descriptions, pictures, and YouTube videos.
_____________________________________________________________________________
Some examples of Tour Builder in Use

English/Language Arts
  • Students can build book tours wherein they plot an author's life and add pictures and videos to enhance the tour. I've seen teachers do it with Shakespeare's life, Cervantes's life, etc. 
  • Students can make a Google tour of a book itself. You can have students plot the events of The Odyssey, for example, adding Google images or even YouTube videos.  Here is a webpage dedicated to Google Lit Trips. 
Social Studies
Science
  • Interested in Jane Goodall's life? Here is an example of a Google Tour of her life, where she has traveled, and what she has done!
  • You can do nature tours of major biomes, such as the Amazon rain forest, adding pictures and video to enhance. 
World Language (my personal favorite!)
  • Have students create guided tours of countries, instead of brochures, to bring a cultural research project into the 21st century!
  • Have your students talk about their own travels within world countries with pictures from the trip or videos. Here is a very rudimentary trip I've created. 
There are many more examples that I haven't listed, as well as ones that I've yet to dream up!
_____________________________________________________________________________
How is it done?
1. Sign in to your Google account and go to https://tourbuilder.withgoogle.com/
2. Click on Create a Tour (or view tours by clicking that option).  


3. You will be brought to an introduction screen. Enter 
your details of the trip and a cover photo. You can customize the type of story, the path color on Google Maps and style of map. 

4. Begin to build the tour, adding locations by searching for locations or dropping a pin directly on the Google Map. You can add dates of travel and a description, as well as photos and videos


5. As the tour takes shape, you will see a progression on the left-hand side, much like a PowerPoint/Google Slides, etc. and you can drag and drop and reorder the tour as well. 


6. After your sweat, tears, and hard work (although, I think it's more like fun, laughter, and wonderment) you can share the tour through a link to either your domain (in a school district) or to the world (anyone with a link!). 


So, that is it! I'm planning on doing this with my students this week into next to replace a brochure project we have done in the past. Let your imagination run wild and have students enjoy doing research and presenting it in a fun and engaging way!

    Any questions? SrBonito1 on Twitter and happy traveling!

Until next time,
Scott

Wednesday, May 11, 2016

Making the Jump to Hyperspace with HyperDocs

Scotty-full power to the front thrusters to make the jump to hyperspace! Sometimes at this point in the year we need an extra boost to make it through the day. As we continue our march toward the finish line for the year, I have yet another excellent use of educational technology to shift how we teach and how students learn. 
Whether it is shifting our thinking on study guides or it is changing the culture of introductions of new concepts, Hyperdocs is an excellent tool to accomplish this goal. 
_________________________________________________________________________________
What is a HyperDoc?
Google defines a HyperDoc as the following: HyperDoc is a term used to describe a Google Doc that contains an innovative lesson for students- a 21st Century worksheet. Essentially, a Hyperdoc is a collection of learning materials that are put together in an easy to follow and interactive GoogleDoc. Below is an example of a HyperDoc that I have used to substitute study guides for students. 

*(You can also do this on Microsoft Word and post the file to a learning management system)*
_________________________________________________________________________________

 With this HypderDoc, I listed what multimedia students had access to, what was the guiding question they should following when watching/working through the multimedia presented, and a check-in activity to assess comprehension after each activity to guide their learning. 


The second HyperDoc I've listed is a self-paced, "Choose-your-own adventure for introducing the topic of the preterit tense". It allows students to learn the necessary materials without enduring lectures, maximizing the benefits of technology, and personalizing the learning experience in an engaging way.

Why Use HyperDocs?: Here are some uses of HyperDocs
  • Create an interactive study guide to help guide students through effective study strategies and have them check for understanding in a clear way to demonstrate success or the need for extra support. 
  • Create a self-paced lesson to introduce students to a topic in a more personalized, self-paced way. Post a "choose your own adventure" type of activity and allow student choice and voice in how they acquire the material. 
  • Create a set of resources for students to investigate a topic that is connected to project-based learning or authentic project-based assessment (Example-Posing the question: Is Social Media harmful to interpersonal relationships?Follow up with different pieces of multimedia evidence that students self-pace through to arrive at a final decision). 
  • Gameify and create a tic-tac-toe board of activities on a topic to practice a previously acquired skill. Students who get tic-tac-toe and demonstrate competency with a topic win! (See picture above for an example of this provided at THIS link)
_________________________________________________________________________________
How to make a HyperDoc/Tips for Making HyperDocs
1. Decide the purpose of your HyperDoc (study-guide? self-paced lesson? Gameify skill practice?).
2. Collect a list of multimedia resources (anywhere between 8-10 websites is a safe bet).
3. Create a GoogleDoc and design the visual layout with different images, fonts, links, etc.         (HERE are some examples)
4. Share the document with your students as a "view only".  (With word, post the .doc file online for students to download)
5. Design an assessment to evaluate students' understanding of the central concept of the HyperDoc. _________________________________________________________________________________

 Try it out! I guarantee it will change your thinking on presentation and assessment of material. Students will love the autonomy and choice! Finally, it brings personalized learning to a new level!

Enjoy taking the jump to Hyperspace with HyperDocs! As always, thank you for reading and please follow me on Twitter @SrBonito1!

Until next time,
Scott


Monday, May 2, 2016

Masterful Classroom Gaming with Kahoot and Quizizz

In an early entry I wrote about gaming in the classroom and how to use it to teach grit, vocabulary, and collaboration. Now I'm following up with two games that I have found to be amazingly helpful in engaging my students, utilizing technology, and reviewing content while the kids have a blast.

Yes, I said it, a blast. Ok, so my kids don't do a group jump with a freeze frame, but every time I mention Kahoot and Quizizz, my kids' adrenaline pump and they act like the best, most engaged, most interested students ever. They grab their devices or the Chromebooks in the room and await further instructions with bated breath. In the entry, I'm going to tell you what these holy grails do, how to use them, and how to get yourself started in 5-7 minutes.

What are they?
Kahoot and Quizizz are web-based gaming platforms that work on all devices and hardware. They use user-designed, multiple-choice questions, paired with music, and they establish a point system to add a dash of that oh-so-delicious competitive edge (which is the reason I always remind my students, like a morning yoga mantra: "Games are fun AND educational. Though we can be competitive, we use them to learn and practice our learning".)


https://www.getkahoot.com                                                     https://www.quizizz.com

How to sign up

How to sign up for Kahoot                                     How to sign up for Quizizz
1. Go to www.getkahoot.com                                   1. Go to www.quizizz.com
2. Click "Sign up for free!"                                       2. Click log-in, and click "click here to sign up"
3.  Enter your details and click "Create account"     3.  Enter your details and click "Create account"    

How to use it: Kahoot
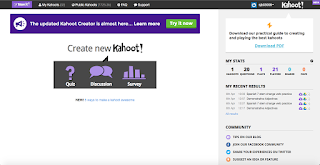
1. Log-in and your screen will look like this:
 
-You can click on "My Kahoots" (Kahoot games that you have created or added from the public realm).

-You can search "Public Kahoots" (of which there are many, believe it or not; you can even copy ones and adjust questions and add your own).

-You can create your own quiz, discussion, or survey.

-When you create your own Kahoots, you can add in images, videos, and add decide if you want to have the questions count for points, or not. You can also set time limits.

How to use it: Quizizz
1. Log-in and your screen will look like this:

-You can click on Public and search communal Quizizzes (of which there are many and, just like kahoot, you can copy/paste, add, change, etc.)

-You can view your Quizizzes that you've created or added from the public domain.

-You can create Quizizzes. You can add images, like Kahoot, time limits, change the text color, and even add a la carte questions from other quizzizes.

-You can view your reports (more on this later). AND

-You can even create your own Memes to add into the games

How students get playing Kahoot and Quizizz
In either website, after you have created or added a quiz set, go to that quiz set and click play or proceed.
 
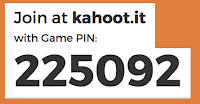
Then, students will receive a website to proceed to and a code to enter, (once they go to either www.kahoot.it

or www.join.quizizz.com


Then, off you go! Set ground rules and you will watch as students play. With Kahoot, there is a status update after each question and with Quizizz there is a status bar for each student and lots of feedback as the game proceeds. I can go on about the details, but the best way to learn is to saddle up and to try it!

But wait...there's more. The feedback

The feedback. The best part of the game is the feedback. Kahoot and Quizizz give you post-game feedback that you can break down by student and by question so that you can plan your intervention after, or invite students in for extra help.
Sample Kahoot Feedback

Sample Quizizz Feedback


That's all she wrote! I wrote a lot of instructions here, but the main thing is to go out and try it! The kids will love it and you will have fun with them. 

Questions? Contact me at @SrBonito1 on Twitter, or comment on the blog entry!

Until next time,
-Scott