
This entry is about EDpuzzle, a technological classroom tool that has long sat on my shelf, unused, but with no other good reason than it never came to pass in my classroom (e.g. I got lazy). So let's get to it!
What is EdPuzzle
Edpuzzle is a web-based tool that allows you to use videos across the web and annotate them with audio notes, audio tracks, and questions. It is truly as necessary a tool in the tool-belt of a flipped classroom aficionado as a hammer is in a real tool belt (though I assure you, that analogy is the extent of my handy-man knowledge).
How Do I Use It? See the Images and Animated Gifs below to guide you!
1. First thing's first (I'm the realest)-EDpuzzle supports single sign-on from Google Accounts, and Edmodo. You can also sign-up and sign-in using any other valid email address! EDpuzzle offers you a tour, if you are the type of person who reads the VCR manuals in order to change that time from 12:00 to something relevant to the actual time. If you choose to skip the tour, that's OK! I always adopt a trial by fire approach with technology.

2. You can add classes and students 1 of 2 ways: A-Importing from Google Classroom, if your district/building/you use(s) Google Classroom. B-You can generate a code, and have students join by logging in themselves and entering the code (or emailing it out to them...or even by TWEETING it out!).
 |
| Method A |
 |
| Method B |
3. Click on "Assign Lesson". On the top right of the next screen click on "Create" then "New video". You could also click on "Upload video", "Student project", or "New folder". Once you click "New video" you will be brought to a screen that allows you to access videos from many different websites, such as: YouTube, Khan Academy, National Geographic, TED Talks, etc.

4. Type in the title of a video, once you have selected a video website/service. Click on the video you want. Click on "Use it" (or "Copy" if you want to add the video to "My Content" for later use!) Once you click "Use it" you will be brought to an edit screen. From left to right on the top menu bar, you can crop the video with the first option on the left, add an audio track, add an audio note, or add a quiz question!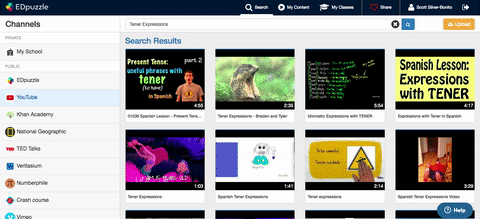
EDpuzzle offers brief video tutorials for all of the editing options. Here is a summary of each:
Here is an example of a video with a question embedded: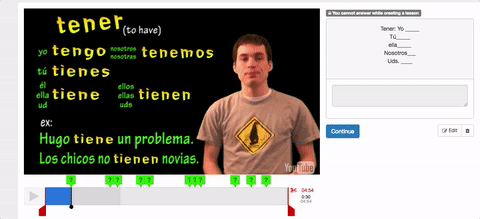
5. Click on "Finish" and assign the video. You can do so through Google Classroom, or through a weblink, embed code, or email.

Now here's the great part! Student data!
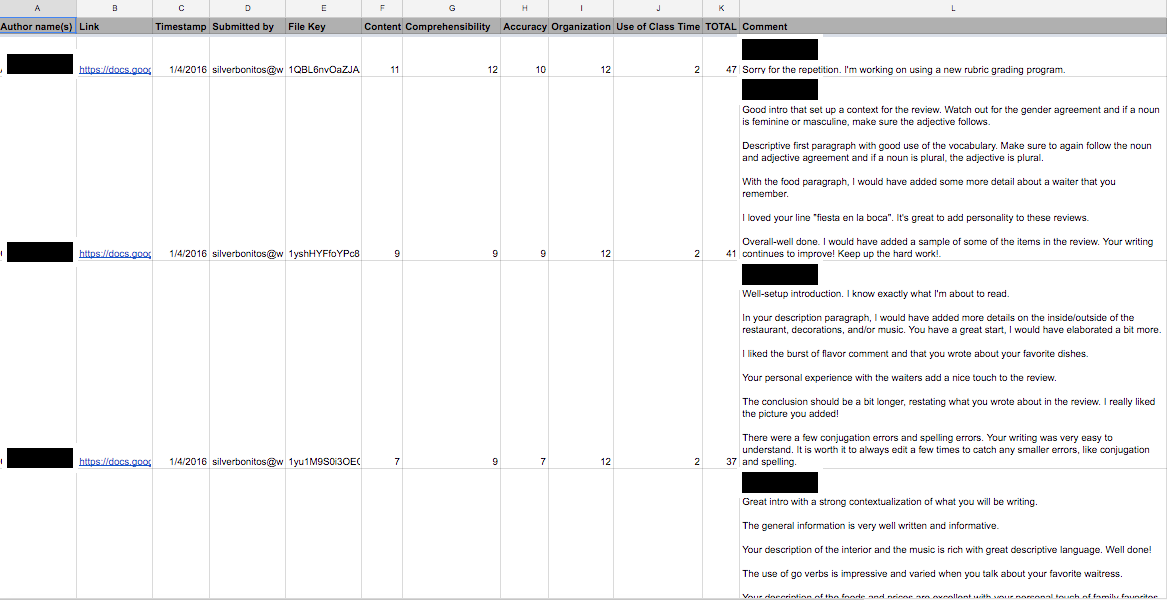
Students can rewatch parts of the video and/or watch the whole video again. After students watch the video, you will get feedback on each student! If you're a dataphile like I am, EDpuzzle will give you a lot of great information like:

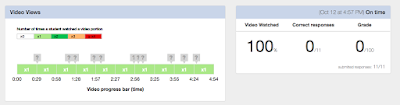 Clicking on the student's name reveals a deeper analysis. You can even export the data to an excel file!
I'm sure that this is a lot to digest, and you may want to go back and read parts of this blog. (Don't worry, I don't get data for how many times you reread certain sections of this blog entry!)
You don't have to slog through the time of making your own material as EDpuzzle has a library of teacher-created activities, such as the one I have shown you above.
So there it is. A non-puzzling answer as to why you should be using EDpuzzle in your classroom. As always, tweet me @SrBonito1 with any questions. You can also explore my other posts such as:
Thank you for reading an until next time,
Scott

EDpuzzle offers brief video tutorials for all of the editing options. Here is a summary of each:
- Crop Video: Allows you to crop out parts of the videos.
- Audio Track: Allows you to overlay audio on top of existent audio within the video. You can add your own commentary or translate pieces of the video, if you choose!
- Audio Notes: Allows you to add an audio note that will pause the video and play before the video resumes. This could be helpful to remind students to take notes or focus on certain parts of the video!
- Quizzes: Allows you to add A-open ended questions, B-multiple choice questions, C-comment, which will display a comment to the students. NOTE-quiz questions will require an answer before the video resumes for the students.
Here is an example of a video with a question embedded:

5. Click on "Finish" and assign the video. You can do so through Google Classroom, or through a weblink, embed code, or email.

Now here's the great part! Student data!
Students can rewatch parts of the video and/or watch the whole video again. After students watch the video, you will get feedback on each student! If you're a dataphile like I am, EDpuzzle will give you a lot of great information like:
- Who watched the video?
- What was the student's score on the quiz questions (the multiple choice ones)?
- When did the student last watch the video?
- Did the student complete the assignment on time?
 Clicking on the student's name reveals a deeper analysis. You can even export the data to an excel file!
- How many times did the student watch a particular segment?
- How much of the video did the student watch?
Finally:
There is an app for this through Chrome and through the iTunes app store to help students complete this work, as well. So many options exist; why aren't you using it now!
You don't have to slog through the time of making your own material as EDpuzzle has a library of teacher-created activities, such as the one I have shown you above.
So there it is. A non-puzzling answer as to why you should be using EDpuzzle in your classroom. As always, tweet me @SrBonito1 with any questions. You can also explore my other posts such as:
- Using ClassDojo in the classroom for positive behavioral support
- Using Google Maps in the classroom
- Creating HyperDocs
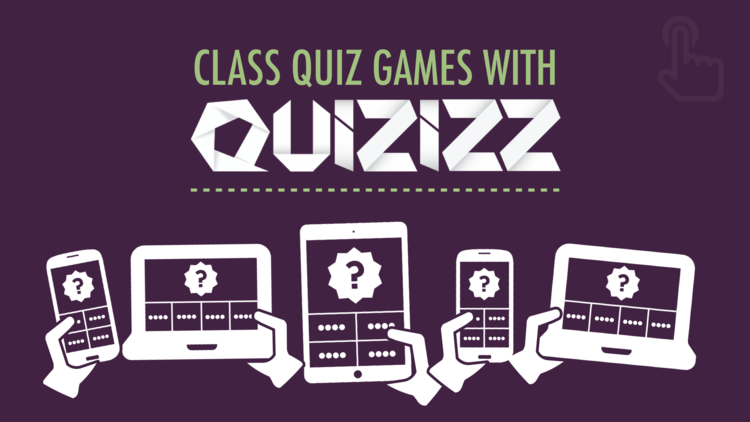
- Using Kahoot and Quizizz in the Classroom
- Leveraging Twitter as a professional
- Using Goobric and Doctopus to assess student work
- The basics on flipping the classroom, and
- Gaming to teach vocabulary
Thank you for reading an until next time,
Scott


