Monday, September 24, 2018

Flipping Out for Flip Grid


Image result for flipgridThis blog post accurately reflects my feeling for the latest EdTech tool to come onto the scene as COMPLETELY free and full-featured: FlipGrid.

What is FlipGrid? Well, in a short statement: FlipGrid is an online tool that allows an educator to post a topic in text or in video and have students post a response, recording themselves in a short, guided response.

So...for what can you use this? Well, this is a great tool for world languages, math, science, social studies, music, art, etc. etc. Let me give you an example of how I've used it.

My students are practicing regular, present-tense verbs. I posted two topics in the FlipGrid:
1. Describe your typical day, using as many AR/ER/IR verbs as possible.
2. Describe the typical day of a celebrity of choice.

Students chose a topic and then recorded a response. Then, I, as the teacher, moderated/watched each response. I had the option, as well, to email students feedback, or post feedback on the video. I set the limit as 1 minute, so the students were halted at the minute mark (though you can decrease or increase that time limit as well).

Some possible applications...

  • You can have students respond to a literary passage in an oral response, instead of writing. 
  • You can post a central question about history and have students respond. 
  • You can ask students to critique a piece of art.
  • You can ask students to make hypotheses prior to a science project. 
How about adult learning? 
  • Veteran teacher advice for new teachers
  • PD quick questions prior to PD sessions
  • School-to-school mentorship programs
  • PLN pen-pals
The uses are endless. The tech is easy. Here is a brief break-down of how to use...

Sign Up
1. Go to FlipGrid.com
2. Click "Sign up Today"
3. Sign up with Google or Microsoft

Log-In
1. Go to FlipGrid.com
2. Click "Educator Login" at the top of the screen
3. Use your account login (Google or Microsoft)

Getting Started
1. Click on "My Grids". 
2. Create a Grid for your courses. This is where your topics and responses will live. Mine was "7Y Spanish FlipGrid". 
3. Once in a created Grid, click "New Topic". 
4. Fill in the needed information (Title, Topic Tip, Set Response Time, description, and date).
5. Set privacy needs (moderation on if you want to have the sole ability to see others' videos). 
6. Add attachments, emojis, links, etc. 
7. Decorate (video features).
8. FINALLY, set type of feedback. 
9. Click "Create Topic". 

Sharing Out for Posting
1. Click "Share Topic" and post the link in a learning management system. 
2. Students, when clicking the link, will sign in using Microsoft and Google account. 

That's it! That's the quick and dirty setup. When you sign up for FlipGrid, there are great resources for PD and even Micro-credentialing. They continue to release new features such as "MixTapes" where you can compile a list of "greatest hits" responses. It's an amazing tool, but I know, as a teacher, time is of the essence so here is the quick start guide!

As always, tweet me at @SrBonito1 with questions or post on this blog. I LOVE this tool and am a convert (also, the students love the emojis they can add to their cover image). 

Until next time, 

Techfully and Innovatively Yours, 
Scott

Monday, September 17, 2018

20% Time and Student Reaction

So, the results are in! We had our first 20% time. Here is the narrative below and some resources for those who want to try.

I started the year with, "We always ask you (students), 'What do you want to learn this year?' and then get too busy to do it...so, here is your opportunity to do it". Eyes widened. "Could he be serious?" The students looked around, wondering if I was really willing to give that control back to the masses. I was, and I did.

This past Friday I gave a brief introduction to my students and followed with a video. I followed with passing students out a plan sheet. Then, I gave them half of the class to brainstorm. I was channeling my inner "design-thinking" guru. The ideas that came out BLEW me away:

-A beginner's guide to Fortnite, for Spanish speakers
-The evolution of medicine in the Spanish-speaking world
-A Spanish-language cast album of "Oliver" the musical
-How-to art tutorials, in Spanish
-Inventions to solve water pollution for Spanish speaking countries
-A Russian to Spanish dictionary

The list goes on and on. Time is short and precious for us, the educators. So, here are my lessons for you innovators:

1. Be comfortable admitting to students that you are "building the plane while flying it".
2. Don't say no to any idea but rather, "Yes...let's explore". The "yes, and..." improvisation rule.
3. Feed the innovation fire. Encourage and be in wonderment of student ideas. This will NOT be hard.
4. Do NOT overplan. (I'm taking this one to heart).
5. Sow the seeds across your building and build excitement. It's contagious.

Finally...

6. Have fun. This was the first time in SO many years that I had JUST as much fun as the students, and the students had JUST as much fun as me. The journey carries on. Follow along :).

Until next, innovative time
-Scott

*Click the links above for resources from me to you!

Thursday, September 6, 2018

20% Time

Light bulb icon by lual
Image credit: https://openclipart.org/detail/154075/light-bulb-icon

New year, new blog direction. The focus for the year will be my reflections on 20% time in my class.

Every year I ask the students, "What do you want to learn about this year"? in an effort to personalize my learning, and every year, the curriculum comes cascading down on me, washing away my efforts in this arena. This year, I will be making a focused effort to do the 20% time in my class.

What is it? Well, "the legend goes" that Google instituted a 20% time, during which staff members were allowed to pursue passion projects during their workweek. Some of the best creations came from the 20% time. Gmail is an example of a product of that time. What does that look like in the classroom? Well, in the classroom, this looks like setting aside time, at regular intervals, to allow students to engage in passion projects using the design process to explore, research, refine, and present. 

So, off I went. I asked students "What do you want to learn this year?" knowing that it would not be a question posed in vain. When I explained 20% time, I received excited looks (on the face of tired middle schoolers, no less!).

This blog will be mixed with technology and reflection on that 20% time (since technology is a great support for it). In the meantime, if you too are interested in 20% time (or a variation), here is an article that I used to launch off from this year, from Edutopia.

I'm looking forward to seeing what the kids do with their 20% time, in World Language, in order to bring some authenticity to their learning and meaningful application to their work.

Until next time,
Scott


Works Cited
Smith, Meshelle. "Genius Hour in Elementary School." Edutopia, 15 September, 2017,     
     https://amp.edutopia.org/article/genius-hour-elementary-school?__twitter_impression=true.    
     Accessed 6 September 2018.

Wednesday, October 12, 2016

A Puzzling Account of Videos in the Flipped Classroom Through EDpuzzle!

After a long absence, I've finally unpacked my bags and have gotten a chance to sit down and blog once more so that I may share with you all the trials and tribulations of technology and pedagogy in the classroom.


This entry is about EDpuzzle, a technological classroom tool that has long sat on my shelf, unused, but with no other good reason than it never came to pass in my classroom (e.g. I got lazy). So let's get to it!


What is EdPuzzle
Edpuzzle is a web-based tool that allows you to use videos across the web and annotate them with audio notes, audio tracks, and questions. It is truly as necessary a tool in the tool-belt of a flipped classroom aficionado as a hammer is in a real tool belt (though I assure you, that analogy is the extent of my handy-man knowledge).

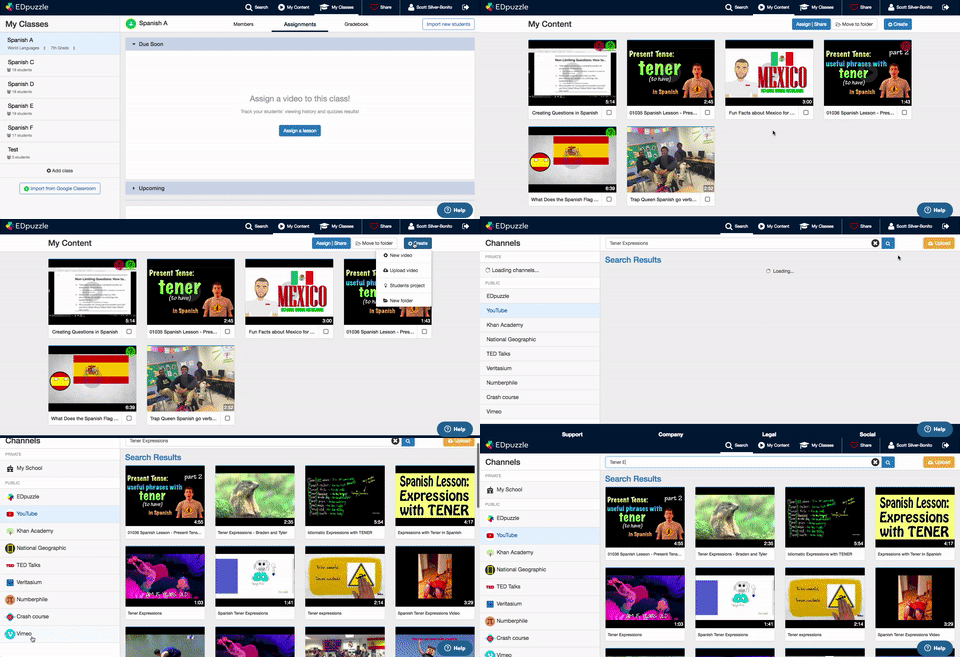
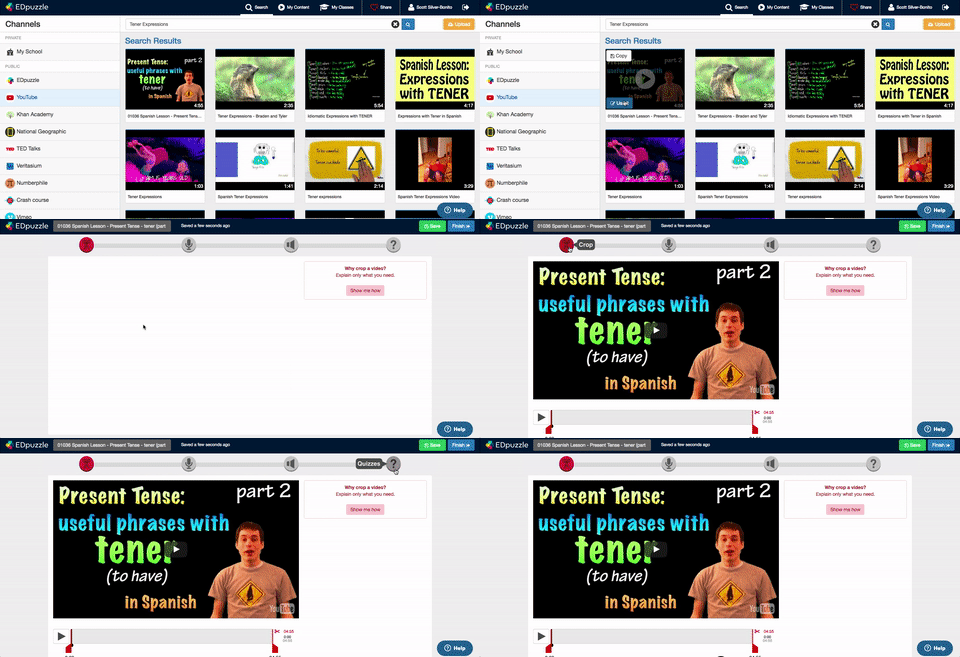
How Do I Use It? See the Images and Animated Gifs below to guide you!
1. First thing's first (I'm the realest)-EDpuzzle supports single sign-on from Google Accounts, and Edmodo. You can also sign-up and sign-in using any other valid email address! EDpuzzle offers you a tour, if you are the type of person who reads the VCR manuals in order to change that time from 12:00 to something relevant to the actual time. If you choose to skip the tour, that's OK! I always adopt a trial by fire approach with technology.

2. You can add classes and students 1 of 2 ways: A-Importing from Google Classroom, if your district/building/you use(s) Google Classroom. B-You can generate a code, and have students join by logging in themselves and entering the code (or emailing it out to them...or even by TWEETING it out!).
Method A


Method B

3. Click on "Assign Lesson". On the top right of the next screen click on "Create" then "New video". You could also click on "Upload video", "Student project", or "New folder". Once you click "New video" you will be brought to a screen that allows you to access videos from many different websites, such as: YouTube, Khan Academy, National Geographic, TED Talks, etc. 

4. Type in the title of a video, once you have selected a video website/service. Click on the video you want. Click on "Use it" (or "Copy" if you want to add the video to "My Content" for later use!) Once you click "Use it" you will be brought to an edit screen. From left to right on the top menu bar, you can crop the video with the first option on the left, add an audio track, add an audio note, or add a quiz question!

EDpuzzle offers brief video tutorials for all of the editing options. Here is a summary of each:


  1. Crop Video: Allows you to crop out parts of the videos. 
  2. Audio Track: Allows you to overlay audio on top of existent audio within the video. You can add your own commentary or translate pieces of the video, if you choose!
  3. Audio Notes: Allows you to add an audio note that will pause the video and play before the video resumes. This could be helpful to remind students to take notes or focus on certain parts of the video!
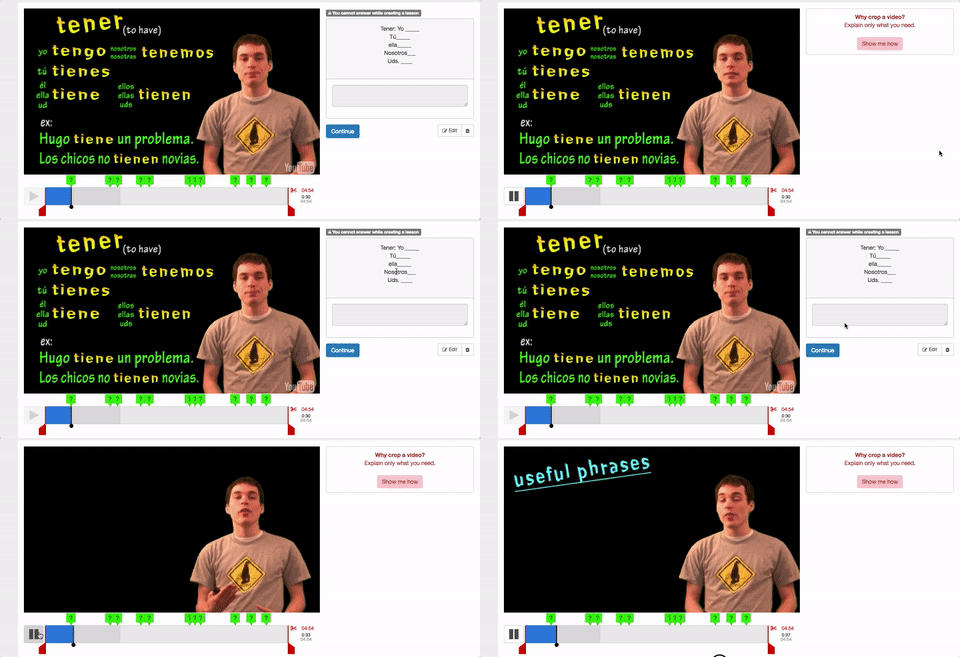
  4. Quizzes: Allows you to add A-open ended questions, B-multiple choice questions, C-comment, which will display a comment to the students. NOTE-quiz questions will require an answer before the video resumes for the students. 


Here is an example of a video with a question embedded: 

5. Click on "Finish" and assign the video. You can do so through Google Classroom, or through a weblink, embed code, or email.

Now here's the great part! Student data!

Students can rewatch parts of the video and/or watch the whole video again. After students watch the video, you will get feedback on each student! If you're a dataphile like I am, EDpuzzle will give you a lot of great information like:

  • Who watched the video? 
  • What was the student's score on the quiz questions (the multiple choice ones)?
  • When did the student last watch the video? 
  • Did the student complete the assignment on time? 

Clicking on the student's name reveals a deeper analysis. You can even export the data to an excel file!


  • How many times did the student watch a particular segment? 
  • How much of the video did the student watch? 
Finally:
There is an app for this through Chrome and through the iTunes app store to help students complete this work, as well. So many options exist; why aren't you using it now! 

I'm sure that this is a lot to digest, and you may want to go back and read parts of this blog. (Don't worry, I don't get data for how many times you reread certain sections of this blog entry!)

You don't have to slog through the time of making your own material as EDpuzzle has a library of teacher-created activities, such as the one I have shown you above.


So there it is. A non-puzzling answer as to why you should be using EDpuzzle in your classroom. As always, tweet me @SrBonito1 with any questions. You can also explore my other posts such as:


Thank you for reading an until next time,
Scott

Thursday, July 7, 2016

Bow to Class Dojo, An Amazing Positive Behavioral Management Tool


Happy Summer, educator friends!

I hope you all are enjoying your breaks (if your school is on such a schedule). I just came back from the ISTE conference in Denver. If you've never been, you should go! (San Antonio 2017!) It was a religious and technological experience. I learned a lot from the conference, which will likely furnish future blog posts. However, in the spirit of mindful and zen-ness, today I'll be talking about Class Dojo today.

What is Class Dojo?
Class Dojo, for those who have not used it, is a positive behavior management resource that is available across all platforms (iOS, Android, Desktop, Laptop, Mac, etc. etc.). I tend to use it on my mobile device for the mobility and immediacy of the feedback.

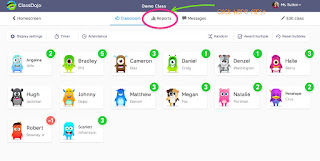
With Class Dojo, students sign up, create avatars, and receive behavioral feedback from you on a day-to-day and macro basis. You design and assign behaviors that you can reward and behaviors you can "punish" (or behaviors for which you can deduct points). From your (the teacher's) daily point awarding, students receive points and can see their trending behavior. For middle school students and below (and I've even used it at a high school level), the kids love to "Do it for the Dojos" (to quote my colleague Carolina!). They also love to create their avatar creatures and take great pride in this task. As a teacher, you get a great overview of your classes (as seen below).

With Class Dojo, in addition to rewarding points and getting some great reports, you can even message parents, take pictures of student work, and soon you will be able to compile student portfolios! You can group students and award points to the groups and you can use "Stories" to display the inner-workings of your creative classroom. Essentially, Class Dojo is very close to a one-stop-shop.

How to Get Started with Class Dojo?
1. Sign up for Class Dojo. It's free! (www.classdojo.com then to "Sign up").
2. Once you've signed up, log-in to www.classdojo.com
3. Once you've logged in, you can fiddle with the settings and your profile. Your start screen will look like mine below.

4. From your "dashboard screen" you can add classes. The options you have, once you click the "Add Class", you have to name your class and specify grade.
5. To add students, you will type in their names. It is a little tedious, but I promise, Class Dojo is well worth the time investment!
6. You can then prepare invites as PDF files which you can then pass out to students on the first day. In fact, when I was late on handing them out, students were clamoring for them.
7. The next step is establishing the behaviors, both the "Positive" and "Needs work". I usually align these with my class participation rubric. You can even customize the icons for that. Piece of advice: keep the behaviors few and student-friendly.
That's it! You are ready to Dojo!

Using Class Dojo
1. On your phone, iPad, desktop, you can do the following from the class view you can do the following:
a. Award full class points
b. Award individual student points
c. Award group points
d. Add students (by hitting the plus button)
e. Take attendance
f. Select a random student (which I do instead of hand raising now)
g. Set a timer
h. View score reports
i. See your class story (if you take pictures of your class on Dojo)
j. Send messages to parents (if they sign up)
k. Adjust settings

In short, you can do A LOT. See my graphic below.


Usable Information


When you go to reports, you will see a screen similar to what you see above. With that screen, you can see the following:
-Whole class progress
-Individual student progress
-Pie charts to illustrate behaviors
-Narrative "events" on when you award a student/class points
-Attendance records

You can adjust this data's time frame as well. You can also view it in a spreadsheet. I find that it helps students, not on an analytical level, but on a holistic level what to see what their participation looks like in class. I also found that parents liked the feedback to foster those conversations at home. As a bonus, it also helps me to fill out their participation rubrics at the end of the marking period.

I'm attaching a few videos below to supplement what I've written above.

-Student introduction to Class Dojo video (to play in class)
-Getting started and using Class Dojo
-My video review of Class Dojo

I hope this has been helpful and that you love Class Dojo as much as I do! Soon they are launching portfolios, which will be an exciting addition!

Happy Dojo-ing and Until Next Time
-Scott

Sunday, May 22, 2016

Road Tripping in the Classroom with Google Tour Builder


Ready for summer vacation? I know most students and teachers are ready for a much needed R&R and recharging of the batteries. Remember when road trips used to be planned using physical maps? Our students probably don't. Though, I remember sitting in the back of my parents' car with the AAA trip-map, cross-checking as we drove down I-95 to Florida. Then it was Mapquest, Google maps, and Apple maps. Google has provided an excellent opportunity to road trip in the classroom without ever having to pack a bag. Google Tour Builder is this opportunity!


What is Google Tour Builder
From the Google Tour Builder website: "Tour Builder is a new way to show people the places you've visited and the experiences you had along the way using Google Earth. It lets you pick the locations right on the map, add in photos, text, and video, and then share your creation." In other words, you can use Google Tour Builder as an opportunity to showcase a geographic tour of different locales, adding text descriptions, pictures, and YouTube videos.
_____________________________________________________________________________
Some examples of Tour Builder in Use

English/Language Arts
  • Students can build book tours wherein they plot an author's life and add pictures and videos to enhance the tour. I've seen teachers do it with Shakespeare's life, Cervantes's life, etc. 
  • Students can make a Google tour of a book itself. You can have students plot the events of The Odyssey, for example, adding Google images or even YouTube videos.  Here is a webpage dedicated to Google Lit Trips. 
Social Studies
Science
  • Interested in Jane Goodall's life? Here is an example of a Google Tour of her life, where she has traveled, and what she has done!
  • You can do nature tours of major biomes, such as the Amazon rain forest, adding pictures and video to enhance. 
World Language (my personal favorite!)
  • Have students create guided tours of countries, instead of brochures, to bring a cultural research project into the 21st century!
  • Have your students talk about their own travels within world countries with pictures from the trip or videos. Here is a very rudimentary trip I've created. 
There are many more examples that I haven't listed, as well as ones that I've yet to dream up!
_____________________________________________________________________________
How is it done?
1. Sign in to your Google account and go to https://tourbuilder.withgoogle.com/
2. Click on Create a Tour (or view tours by clicking that option).  


3. You will be brought to an introduction screen. Enter 
your details of the trip and a cover photo. You can customize the type of story, the path color on Google Maps and style of map. 

4. Begin to build the tour, adding locations by searching for locations or dropping a pin directly on the Google Map. You can add dates of travel and a description, as well as photos and videos


5. As the tour takes shape, you will see a progression on the left-hand side, much like a PowerPoint/Google Slides, etc. and you can drag and drop and reorder the tour as well. 


6. After your sweat, tears, and hard work (although, I think it's more like fun, laughter, and wonderment) you can share the tour through a link to either your domain (in a school district) or to the world (anyone with a link!). 


So, that is it! I'm planning on doing this with my students this week into next to replace a brochure project we have done in the past. Let your imagination run wild and have students enjoy doing research and presenting it in a fun and engaging way!

    Any questions? SrBonito1 on Twitter and happy traveling!

Until next time,
Scott

Wednesday, May 11, 2016

Making the Jump to Hyperspace with HyperDocs

Scotty-full power to the front thrusters to make the jump to hyperspace! Sometimes at this point in the year we need an extra boost to make it through the day. As we continue our march toward the finish line for the year, I have yet another excellent use of educational technology to shift how we teach and how students learn. 
Whether it is shifting our thinking on study guides or it is changing the culture of introductions of new concepts, Hyperdocs is an excellent tool to accomplish this goal. 
_________________________________________________________________________________
What is a HyperDoc?
Google defines a HyperDoc as the following: HyperDoc is a term used to describe a Google Doc that contains an innovative lesson for students- a 21st Century worksheet. Essentially, a Hyperdoc is a collection of learning materials that are put together in an easy to follow and interactive GoogleDoc. Below is an example of a HyperDoc that I have used to substitute study guides for students. 

*(You can also do this on Microsoft Word and post the file to a learning management system)*
_________________________________________________________________________________

 With this HypderDoc, I listed what multimedia students had access to, what was the guiding question they should following when watching/working through the multimedia presented, and a check-in activity to assess comprehension after each activity to guide their learning. 


The second HyperDoc I've listed is a self-paced, "Choose-your-own adventure for introducing the topic of the preterit tense". It allows students to learn the necessary materials without enduring lectures, maximizing the benefits of technology, and personalizing the learning experience in an engaging way.

Why Use HyperDocs?: Here are some uses of HyperDocs
  • Create an interactive study guide to help guide students through effective study strategies and have them check for understanding in a clear way to demonstrate success or the need for extra support. 
  • Create a self-paced lesson to introduce students to a topic in a more personalized, self-paced way. Post a "choose your own adventure" type of activity and allow student choice and voice in how they acquire the material. 
  • Create a set of resources for students to investigate a topic that is connected to project-based learning or authentic project-based assessment (Example-Posing the question: Is Social Media harmful to interpersonal relationships?Follow up with different pieces of multimedia evidence that students self-pace through to arrive at a final decision). 
  • Gameify and create a tic-tac-toe board of activities on a topic to practice a previously acquired skill. Students who get tic-tac-toe and demonstrate competency with a topic win! (See picture above for an example of this provided at THIS link)
_________________________________________________________________________________
How to make a HyperDoc/Tips for Making HyperDocs
1. Decide the purpose of your HyperDoc (study-guide? self-paced lesson? Gameify skill practice?).
2. Collect a list of multimedia resources (anywhere between 8-10 websites is a safe bet).
3. Create a GoogleDoc and design the visual layout with different images, fonts, links, etc.         (HERE are some examples)
4. Share the document with your students as a "view only".  (With word, post the .doc file online for students to download)
5. Design an assessment to evaluate students' understanding of the central concept of the HyperDoc. _________________________________________________________________________________

 Try it out! I guarantee it will change your thinking on presentation and assessment of material. Students will love the autonomy and choice! Finally, it brings personalized learning to a new level!

Enjoy taking the jump to Hyperspace with HyperDocs! As always, thank you for reading and please follow me on Twitter @SrBonito1!

Until next time,
Scott